
Introduction
Since very long I was thinking of starting my own blog site, but due to other priorities and blockers it always took last position on my TODO list. But today I will be starting with this blog where I will be discussing a feature of Dynamic 365 V9.X which is not used very often but is very critical when it comes down to client who supports multi-lingual employees and clients.
Recently in my project I came across a requirement to have bilingual content (English and French) on HTML Web-Resources which was added to the Model Driven App form. Before V9 there was no out of the box solution for this requirement. But I have seen many different implementations such as in one implementation content was hardcoded in both the languages and in other implementation there where two different web-resources with English and French hardcoded string content and depending upon the current logged in user’s preferred language correct web resources is shown and other is hidden using JavaScript api. In my opinion the first approach of having content hardcoded in the web resource for both the languages can work some cases but not in all, think of an scenario where you may have to display multiline text, which might not be the good user experience and also since the text is hardcoded any updates to text must be directly updated in the web resource. Second option will require lot of development and is difficult to maintain because you might end up with lot of web resources serving same purpose. But because there was no out of the box solution before V9 these solutions used to work depending upon the requirement.
To provide the out of box solution Microsoft introduced String RESX Web Resource from Dynamic 365 CE V9. Lets see what are RESX files and how these can be used to implemented localization to our web resource.
RESX web resources contain the keys and localized string values for a single language defined using the RESX XML format. RESX is the common format for defining localized resources for .Net applications, but when these files are published to Dataverse as web resources it is converted into JSON format. This JSON file is then used by the application to get requested string value.
Here are the high level steps that describes how we can use RESX files for content localization in HTML or JavaScript web-resource.
- Create String Web Resource file with .resx extension for each language with same Keys and translated string values.
- For each RESX create RESX web resource with proper naming convention web-resourcename.languagecode.resx eg: ps_instructions.1036.resx
- Add these RESX files as Web Resource dependencies to JavaScript web resource in which localization is required by JavaScript or by HTML type web resource.
- Used JavaScript api utility method Xrm.Utility.getResourceString(webResourceName, key) to get the localized string based on the user’s preferred language and replace the default value using JavaScript.
Step By Step Instruction
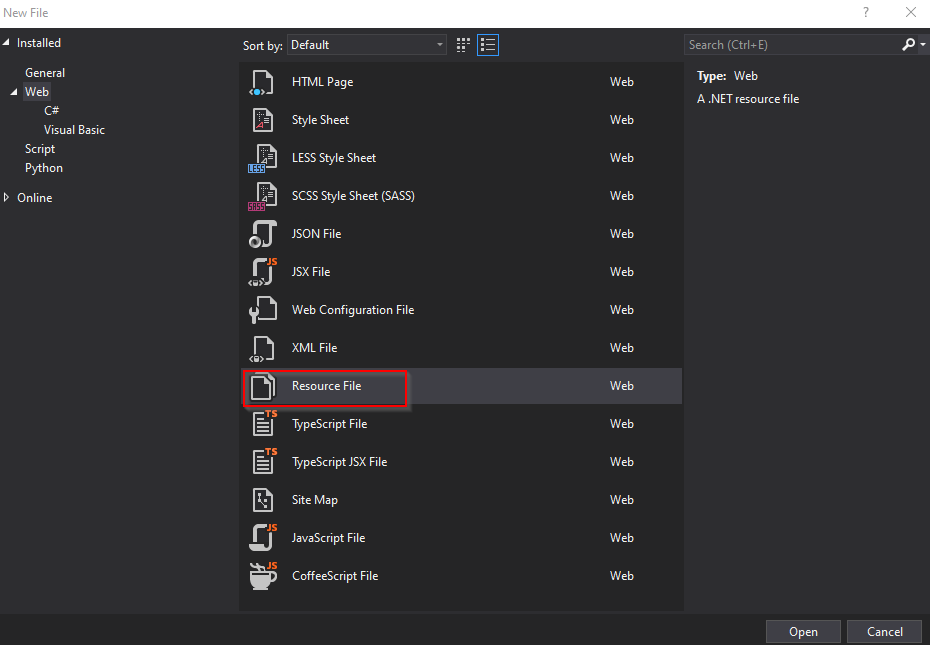
- Step 1: Using Visual Studio add new “Resource File” to existing or new project as show below
- Step 2: Save this file with following naming convention web-resourcename.languagecode.resx, in this case I used instructions.1036.resx and instructions.1033.resx.
- Step 3: Add localized values and corresponding keys using RESX design viewer in Visual Studio, see below

- Step 4: Now login into https://make.powerapps.com/ and then create new web resource by navigate to Solution > New > Other > Web Resource

- Step 5: Here are the details while creating RESX web resource as show below:
- Name: Use the naming conventions web-resourcename.languagecode.resx, in this case I used ps_instructions.1036.resx. Naming convention must be properly followed to avoid any issues.
- Display Name: instructions.1036.resx
- Description: Meaningful description for the web-resource
- Type: String(RESX)
- Language: Select appropriate language, in this case I selected “French”
- Upload File: Select instruction.1036.resx file created in Step 1 and 2.

- Step 6: Hit “Save” and then “Publish”.
- Step 7: Repeat Step 1 through 7 for all required languages. In this example I repeated these steps for English language (1033). I did this just because I did not wanted to use hardcoded values in HTML web resource.
- Step 8: Now we need to make sure we load String RESX files ONLOAD of the form. For this we need to add these files as dependencies to our the web resource in which we would like to perform localization. In this example we as are using HTML web resource so we will not be able add these files as dependencies to the HTML web resource because these files will not be available when the form is loaded. To get around this issue follow these sub-steps:
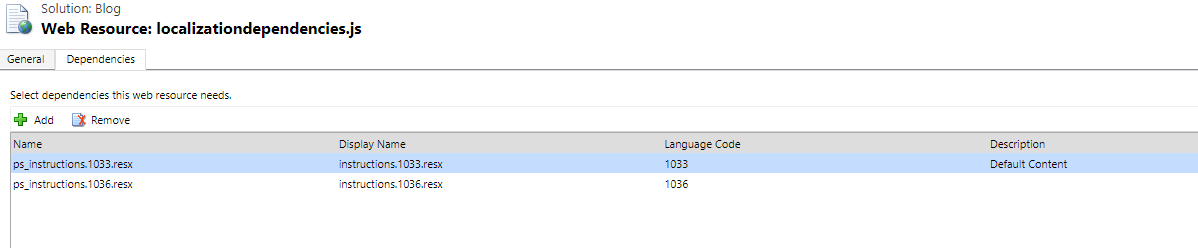
- Create a JavaScript web resource called “ps_localizationdependencies.js” (you can name whatever you want) with a stub function “function loadForm(){};“
- Search and add all the RESX web resources created in Step 5,6 and 7 one by one as dependencies to this JavaScript web resource as show below:
- Step 9: Add “ps_localizationdependencies.js” as Form Libraries under Form Properties for the the form on which you are using the HTML web resource, in this example I am using “ps_instruction.html” and the form that I am using is “Contact” form in Contact Table.

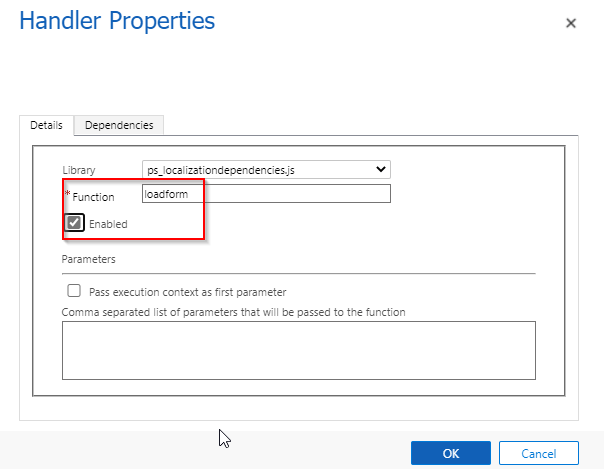
- Step 10: Add OnLoad Event for “ps_localizationdependencies.js” and invoke sub loadform() function as show in the screenshot.
- Step 11: Now write the JavaScript to use RESX files to localized string values. If localization is required JavaScript web resource then you might want to add this script in “ps_localizationdependencies.js” itself (for this example, you might have different script). If localization is required for HTML web resource then add script in the HTML web resource. For this example I will update the “ps_instruction.html” web resource as below
<html>
    <head>
        https://code.jquery.com/jquery-3.6.0.min.js
    </head>
    <body style="overflow-wrap: break-word;">
        <section>
            <h3><span id="instruction_title"></h3>
            <p>
                <span id="instruction"></span>
            </p>
        </section>
    </body>

 <style>
    body    { font-family: "Segoe UI Regular", SegoeUI, "Segoe UI" }
 </style>
 <script>

        function GetTranslatedString(webResourceName, key)
        {
            return parent.Xrm.Utility.getResourceString(webResourceName, key);
        };
        function UpdateStringLiterals()
        {
            var instruction = GetTranslatedString("ps_instructions", "Instruction");
            var instruction_header = GetTranslatedString("ps_instructions", "InstructionHeading");
            $("#instruction").text(instruction);
            $("#instruction_title").text(instruction_header);
        }
        $(function ()
        {
            UpdateStringLiterals();
        });

 </script>
</html>
Lets break down what I did in the above code.
- Added reference to CDM JQuery script tag, this is an optional step. If you don’t want to use JQuery then you can just use OOB JavaScript and call the function on the load of “ps_instruction.html” web resource.
- Added Script tag with following functions:
- GetTranslatedString : This function is used to get the String from RESX files by passing two parameters “webResouceName” and “key”. It uses OOB Xrm.Utility.getResourceString api function to retrieve string value from correct RESX file depending upon the current user’s preferred language.
- UpdateStringLiterals : This function performs two task, one to get the string from RESX resource file and secondly it update required element in HTML.
Outcome
Here is the result of implementing the steps for “Contact” from for the HTML web resource “ps_instruction.html“.
- If the preferred language for user is set to be “English” below is the result seen on the “Contact” from:

- If the preferred language for user is set to be “French” below is the result seen on the “Contact” from:

- To know more on how to enable languages in your environment please visit here
- To know more on how to change preferred language of a user please visit here
Things to consider
- Default language for Organization is consider as a fallback language option for RESX resources. What that means if RESX file is missing for a preferred language then organization default language will return the string values.
- If “Key” is not found in RESX file then “Xrm.Utility.getResourceString“ function will return null.
Final Remarks
Before Dynamic 365 V9 localization tasks around web resources were pretty challenging from development perspective as there was no out of the box efficient option to deal with these requirements. But since Xrm.Utility.getResourceString function is added localization for web resources has become very easy to achieve.
Hope this is helpful. Please leave comments or if you have any questions, I will be more than happy to respond.
